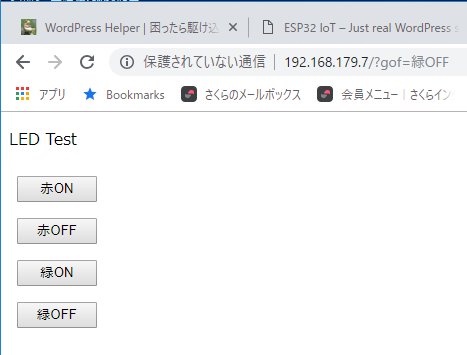
なんかいい感じになってきた。LEDを増やしWEBデザインも押しボタンにしてみた。少しは頭使わないとね。
Auduinoのコンパイルエラーで理由が分からないのあるな。今のところコツは、無視して強硬!!
ブラウザからボタン・クリックでで、ピン5とピン14に接続したLEDを点灯や滅灯させる制御。このリストの次で説明のものは何故かiPhone5だと動かなかった。シリアルモニタに出力される GETの引数が化ける・・・。iPadも mac も問題ない。以下は全機種で制御できている。
/**
 WiFi Web Server LED Blink
*/

#include <WiFi.h>

const char* ssid     = "wx03-bc7caa";
const char* password = "50547acdc2730";

const char html[] =
"<!DOCTYPE html><html lang='ja'><head><meta charset='UTF-8'>\
<style text='text/css'>\
.btn{display  :inline-block;  font-size :49pt;   text-align : center;   border : 2px solid #000066;}\
.btn:hover {  color  : #000066;  background    : #ffffff; }</style>\
<title>WiFi_LED Test</title></head>\
<body><p>LED Test</p>\
<form method='get'>\
<input type ='submit' name='ron' value = '赤ON  ' class ='btn' /><br><br>\
<input type='submit' name='rof' value='赤OFF' class ='btn'/><br><br><br>\
<input type='submit' name='gon' value='緑ON  '  class ='btn'/><br><br>\
<input type='submit' name='gof' value='緑OFF' class ='btn'/><br>\
</form></body></html>";


WiFiServer server(80);

const int led5 = 5;
const int led14 = 14;

void setup()
{
    Serial.begin(115200);
    pinMode(led5, OUTPUT);      // set the LED pin mode
    pinMode(led14, OUTPUT);
    delay(10);

    // We start by connecting to a WiFi network

    Serial.println();
    Serial.println();
    Serial.print("Connecting to ");
    Serial.println(ssid);

    WiFi.begin(ssid, password);

    while (WiFi.status() != WL_CONNECTED) {
        delay(500);
        Serial.print(".");
    }

    Serial.println("");
    Serial.println("WiFi connected.");
    Serial.println("IP address: ");
    Serial.println(WiFi.localIP());

    server.begin();

}

int value = 0;

void loop(){
 WiFiClient client = server.available();   // listen for incoming clients

  if (client) {                             // if you get a client,
    Serial.println("New Client.");           // print a message out the serial port
    String currentLine = "";                // make a String to hold incoming data from the client
    while (client.connected()) {            // loop while the client's connected
      if (client.available()) {             // if there's bytes to read from the client,
        char c = client.read();             // read a byte, then
        Serial.write(c);                    // print it out the serial monitor
        if (c == '\n') {                    // if the byte is a newline character

          // if the current line is blank, you got two newline characters in a row.
          // that's the end of the client HTTP request, so send a response:
          if (currentLine.length() == 0) {
            // HTTP headers always start with a response code (e.g. HTTP/1.1 200 OK)
            // and a content-type so the client knows what's coming, then a blank line:
            client.println("HTTP/1.1 200 OK");
            client.println("Content-type:text/html");
            client.println();

            // the content of the HTTP response follows the header:
            client.print("<h1>Click <a href=\"/H\">here</a> to turn the LED on pin 5 on.</h1>");
            client.print("<h1>Click <a href=\"/L\">here</a> to turn the LED on pin 5 off.</h1><br>");
            client.print("<h1>Click <a href=\"/M\">here</a> to turn the LED on pin 14 on.</h1>");
            client.print("<h1>Click <a href=\"/N\">here</a> to turn the LED on pin 14 off.</h1><br>");

            //client.print(html);
            // The HTTP response ends with another blank line:
            client.println();
            // break out of the while loop:
            break;
          } else {    // if you got a newline, then clear currentLine:
            currentLine = "";
          }
        } else if (c != '\r') {  // if you got anything else but a carriage return character,
          currentLine += c;      // add it to the end of the currentLine
        }

        // Check to see if the client request was "GET /H" or "GET /L":
        if (currentLine.endsWith("GET /H")) {
          digitalWrite(led5, HIGH);               // GET /H turns the LED on
         }
        if (currentLine.endsWith("GET /L")) {
          digitalWrite(led5, LOW);                // GET /L turns the LED off
          }
        if (currentLine.endsWith("GET /M")) {
            digitalWrite(led14, HIGH);
        }
        if (currentLine.endsWith("GET /N")) {
          digitalWrite(led14, LOW);
        }

      }
    }
    // close the connection:
    client.stop();
    Serial.println("Client Disconnected.");
  }
}
/**
 WiFi Web Server LED Blink
*/

#include <WiFi.h>

// mobile routerのもの
const char* ssid     = "wx03-xxxx";
const char* password = "xxxxxxxxx";

const char html[] =
"<!DOCTYPE html><html lang='ja'><head><meta charset='UTF-8'>\
<style>input {margin:8px;width:80px;}\
div {font-size:16pt;color:red;text-align:center;width:400px;border:groove 40px orange;}</style>\
<title>WiFi_LED Test</title></head>\
<body><p>LED Test</p>\
<form method='get'>\
<input type='submit' name='ron' value='赤ON' /><br>\
<input type='submit' name='rof' value='赤OFF' /><br>\
<input type='submit' name='gon' value='緑ON' /><br>\
<input type='submit' name='gof' value='緑OFF' /><br>\
</form></body></html>";


WiFiServer server(80);

const int led5 = 5;
const int led14 = 14;

void setup()
{
    Serial.begin(115200);
    pinMode(led5, OUTPUT);      // set the LED pin mode
    pinMode(led14, OUTPUT);
    delay(10);

    // We start by connecting to a WiFi network

    Serial.println();
    Serial.println();
    Serial.print("Connecting to ");
    Serial.println(ssid);

    WiFi.begin(ssid, password);

    while (WiFi.status() != WL_CONNECTED) {
        delay(500);
        Serial.print(".");
    }

    Serial.println("");
    Serial.println("WiFi connected.");
    Serial.println("IP address: ");
    Serial.println(WiFi.localIP());

    server.begin();

}

int value = 0;

void loop(){
 WiFiClient client = server.available();   // listen for incoming clients

  if (client) {                             // if you get a client,
    Serial.println("New Client.");           // print a message out the serial port
    String currentLine = "";                // make a String to hold incoming data from the client
    while (client.connected()) {            // loop while the client's connected
      if (client.available()) {             // if there's bytes to read from the client,
        char c = client.read();             // read a byte, then
        Serial.write(c);                    // print it out the serial monitor
        if (c == '\n') {                    // if the byte is a newline character

          // if the current line is blank, you got two newline characters in a row.
          // that's the end of the client HTTP request, so send a response:
          if (currentLine.length() == 0) {
            // HTTP headers always start with a response code (e.g. HTTP/1.1 200 OK)
            // and a content-type so the client knows what's coming, then a blank line:
            client.println("HTTP/1.1 200 OK");
            client.println("Content-type:text/html");
            client.println();

            // the content of the HTTP response follows the header:
            client.print(html);
            // The HTTP response ends with another blank line:
            client.println();
            // break out of the while loop:
            break;
          } else {    // if you got a newline, then clear currentLine:
            currentLine = "";
          }
        } else if (c != '\r') {  // if you got anything else but a carriage return character,
          currentLine += c;      // add it to the end of the currentLine
        }

        if (currentLine.endsWith("GET /?gon")) {
          digitalWrite(led5, HIGH);
         }
        if (currentLine.endsWith("GET /?gof")) {
          digitalWrite(led5, LOW);
          }
        if (currentLine.endsWith("GET /?ron")) {
            digitalWrite(led14, HIGH);
        }
        if (currentLine.endsWith("GET /?rof")) {
          digitalWrite(led14, LOW);
        }

      }
    }
    // close the connection:
    client.stop();
    Serial.println("Client Disconnected.");
  }
}
●考察
macでうまく書き込めた。これでキット単独で動作していることになる(電池でも動くということ)。
別PCのWindows10のUSBアダプタにつないで動作確認。キットの電源ONの赤色LEDは点いている。スマホからアクセスすると動作しない・・・。
アダプタはACアダプタ付きだからポートのパワーは問題ないはずだが。見るとアダプタの電源が入っていないじゃないか。テラタームでキットからの情報は表示されている。ブラウンアウトでリセットを繰り返していた。思ったよりというかキットの起動電流は少なくないというのは本当だ。