KKHMF BME280 ESP8266でプログラム

やっと到着した。ソースのサンプル発見。スイッチサイエンスの基板でとあるが基本は変わらないはず。ラズベリーパイでなく今回はこちらで行うことにしてみる。

Copyright (c) 2015, Embedded Adventures
All rights reserved.

Contact us at source [at] embeddedadventures.com
www.embeddedadventures.com
 
Redistribution and use in source and binary forms, with or without
modification, are permitted provided that the following conditions are met:
 
- Redistributions of source code must retain the above copyright notice,
  this list of conditions and the following disclaimer.
 
- Redistributions in binary form must reproduce the above copyright
  notice, this list of conditions and the following disclaimer in the
  documentation and/or other materials provided with the distribution.
 
- Neither the name of Embedded Adventures nor the names of its contributors
  may be used to endorse or promote products derived from this software
  without specific prior written permission.
  
THIS SOFTWARE IS PROVIDED BY THE COPYRIGHT HOLDERS AND CONTRIBUTORS "AS IS"
AND ANY EXPRESS OR IMPLIED WARRANTIES, INCLUDING, BUT NOT LIMITED TO, THE
IMPLIED WARRANTIES OF MERCHANTABILITY AND FITNESS FOR A PARTICULAR PURPOSE
ARE DISCLAIMED. IN NO EVENT SHALL THE COPYRIGHT HOLDER OR CONTRIBUTORS BE
LIABLE FOR ANY DIRECT, INDIRECT, INCIDENTAL, SPECIAL, EXEMPLARY, OR
CONSEQUENTIAL DAMAGES (INCLUDING, BUT NOT LIMITED TO, PROCUREMENT OF
SUBSTITUTE GOODS OR SERVICES; LOSS OF USE, DATA, OR PROFITS; OR BUSINESS
INTERRUPTION) HOWEVER CAUSED AND ON ANY THEORY OF LIABILITY, WHETHER IN 
CONTRACT, STRICT LIABILITY, OR TORT (INCLUDING NEGLIGENCE OR OTHERWISE) 
ARISING IN ANY WAY OUT OF THE USE OF THIS SOFTWARE, EVEN IF ADVISED OF 
THE POSSIBILITY OF SUCH DAMAGE.
 
*/
 
// BME280 MOD-1022 weather multi-sensor Arduino demo
// Written originally by Embedded Adventures
 
#include <BME280_MOD-1022.h>
 
#include <Wire.h>
 
// Arduino needs this to pring pretty numbers
 
void printFormattedFloat(float x, uint8_t precision) {
char buffer[10];
 
  dtostrf(x, 7, precision, buffer);
  Serial.print(buffer);
 
}
 
 
// print out the measurements
 
void printCompensatedMeasurements(void) {
 
float temp, humidity,  pressure, pressureMoreAccurate;
double tempMostAccurate, humidityMostAccurate, pressureMostAccurate;
char buffer[80];
 
  temp      = BME280.getTemperature();
  humidity  = BME280.getHumidity();
  pressure  = BME280.getPressure();
   
  pressureMoreAccurate = BME280.getPressureMoreAccurate();  // t_fine already calculated from getTemperaure() above
   
  tempMostAccurate     = BME280.getTemperatureMostAccurate();
  humidityMostAccurate = BME280.getHumidityMostAccurate();
  pressureMostAccurate = BME280.getPressureMostAccurate();
  Serial.println("                Good  Better    Best");
  Serial.print("Temperature  ");
  printFormattedFloat(temp, 2);
  Serial.print("         ");
  printFormattedFloat(tempMostAccurate, 2);
  Serial.println();
   
  Serial.print("Humidity     ");
  printFormattedFloat(humidity, 2);
  Serial.print("         ");
  printFormattedFloat(humidityMostAccurate, 2);
  Serial.println();
 
  Serial.print("Pressure     ");
  printFormattedFloat(pressure, 2);
  Serial.print(" ");
  printFormattedFloat(pressureMoreAccurate, 2);
  Serial.print(" ");
  printFormattedFloat(pressureMostAccurate, 2);
  Serial.println();
}
 
 
// setup wire and serial
 
void setup()
{
  Wire.begin();     // Wire.begin(sda, scl)
  pinMode(12, OUTPUT);
  Serial.begin(115200);
}
 
// main loop
 
void loop()
{
 
  uint8_t chipID;
   
  Serial.println();
  Serial.println();
  Serial.println("Welcome to the BME280 MOD-1022 weather multi-sensor test sketch!");
  Serial.println("Embedded Adventures (www.embeddedadventures.com)");
  chipID = BME280.readChipId();
   
  // find the chip ID out just for fun
  Serial.print("ChipID = 0x");
  Serial.println(chipID, HEX);
   
  
  // need to read the NVM compensation parameters
  BME280.readCompensationParams();
   
  // Need to turn on 1x oversampling, default is os_skipped, which means it doesn't measure anything
  BME280.writeOversamplingPressure(os1x);  // 1x over sampling (ie, just one sample)
  BME280.writeOversamplingTemperature(os1x);
  BME280.writeOversamplingHumidity(os1x);
   
  // example of a forced sample.  After taking the measurement the chip goes back to sleep
  BME280.writeMode(smForced);
  while (BME280.isMeasuring()) {
    Serial.println("Measuring...");
    delay(50);
  }
  Serial.println("Done!");
   
  // read out the data - must do this before calling the getxxxxx routines
  BME280.readMeasurements();
  Serial.print("Temp=");
  Serial.println(BME280.getTemperature());  // must get temp first
  Serial.print("Humidity=");
  Serial.println(BME280.getHumidity());
  Serial.print("Pressure=");
  Serial.println(BME280.getPressure());
  Serial.print("PressureMoreAccurate=");
  Serial.println(BME280.getPressureMoreAccurate());  // use int64 calculcations
  Serial.print("TempMostAccurate=");
  Serial.println(BME280.getTemperatureMostAccurate());  // use double calculations
  Serial.print("HumidityMostAccurate=");
  Serial.println(BME280.getHumidityMostAccurate()); // use double calculations
  Serial.print("PressureMostAccurate=");
  Serial.println(BME280.getPressureMostAccurate()); // use double calculations
   
  // Example for "indoor navigation"
  // We'll switch into normal mode for regular automatic samples
   
  BME280.writeStandbyTime(tsb_0p5ms);        // tsb = 0.5ms
  BME280.writeFilterCoefficient(fc_16);      // IIR Filter coefficient 16
  BME280.writeOversamplingPressure(os16x);    // pressure x16
  BME280.writeOversamplingTemperature(os2x);  // temperature x2
  BME280.writeOversamplingHumidity(os1x);     // humidity x1
   
  BME280.writeMode(smNormal);
    
  while (1) {
    digitalWrite(12, HIGH);
    while (BME280.isMeasuring()) {
 
    }
     
    // read out the data - must do this before calling the getxxxxx routines
    BME280.readMeasurements();
    printCompensatedMeasurements();
     
    delay(1000);
    Serial.println();
 
    digitalWrite(12, LOW);
    delay(1000);
  }
}


ありゃりゃ遅れてるぞ!

AWSでFree RTOSにESP32追加
アマゾン「AWS IoT」は何が衝撃的なのか
MQTTでIoT(MMQTTとは何か)

何だか別の視点でというか・・・。電子屋やソフト屋の視点だけでは世の中の変革について行けない。作るのは電子工作(枝葉末節:半田付け・プログラム)だけど創る視点で市場を見る眼が必要だ(毎回言ってるような)。

【閑話休題】

小学校からプログラミング不要は思い違いだったようだ。
最初の言語が拙いものでもいい。if文が分かれば後は何とかなる。
後は子供たちのレベルで動くものや遊びを表現して行ける。子供の集中力は凄まじいものがあるから大いに期待できる。

誰でもある程度まで行ける時代(21世紀)に来た。
AuduinoやPythonがそれを可能にし始めている。

ESP32 LEDをWIFIで制御

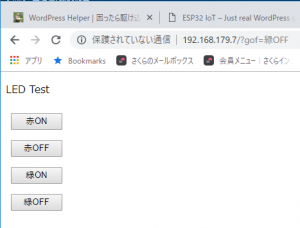
なんかいい感じになってきた。LEDを増やしWEBデザインも押しボタンにしてみた。少しは頭使わないとね。
Auduinoのコンパイルエラーで理由が分からないのあるな。今のところコツは、無視して強硬!!

ブラウザからボタン・クリックでで、ピン5とピン14に接続したLEDを点灯や滅灯させる制御。このリストの次で説明のものは何故かiPhone5だと動かなかった。シリアルモニタに出力される GETの引数が化ける・・・。iPadも mac も問題ない。以下は全機種で制御できている。

/**
 WiFi Web Server LED Blink
*/
 
#include <WiFi.h>

const char* ssid     = "wx03-bc7caa";
const char* password = "50547acdc2730";

const char html[] = 
"<!DOCTYPE html><html lang='ja'><head><meta charset='UTF-8'>\
<style text='text/css'>\
.btn{display  :inline-block;  font-size :49pt;   text-align : center;   border : 2px solid #000066;}\
.btn:hover {  color  : #000066;  background    : #ffffff; }</style>\
<title>WiFi_LED Test</title></head>\
<body><p>LED Test</p>\
<form method='get'>\
<input type ='submit' name='ron' value = '赤ON  ' class ='btn' /><br><br>\
<input type='submit' name='rof' value='赤OFF' class ='btn'/><br><br><br>\
<input type='submit' name='gon' value='緑ON  '  class ='btn'/><br><br>\
<input type='submit' name='gof' value='緑OFF' class ='btn'/><br>\
</form></body></html>";


WiFiServer server(80);

const int led5 = 5;
const int led14 = 14;

void setup()
{
    Serial.begin(115200);
    pinMode(led5, OUTPUT);      // set the LED pin mode
    pinMode(led14, OUTPUT);
    delay(10);

    // We start by connecting to a WiFi network

    Serial.println();
    Serial.println();
    Serial.print("Connecting to ");
    Serial.println(ssid);

    WiFi.begin(ssid, password);

    while (WiFi.status() != WL_CONNECTED) {
        delay(500);
        Serial.print(".");
    }

    Serial.println("");
    Serial.println("WiFi connected.");
    Serial.println("IP address: ");
    Serial.println(WiFi.localIP());
    
    server.begin();

}

int value = 0;

void loop(){
 WiFiClient client = server.available();   // listen for incoming clients

  if (client) {                             // if you get a client,
    Serial.println("New Client.");           // print a message out the serial port
    String currentLine = "";                // make a String to hold incoming data from the client
    while (client.connected()) {            // loop while the client's connected
      if (client.available()) {             // if there's bytes to read from the client,
        char c = client.read();             // read a byte, then
        Serial.write(c);                    // print it out the serial monitor
        if (c == '\n') {                    // if the byte is a newline character

          // if the current line is blank, you got two newline characters in a row.
          // that's the end of the client HTTP request, so send a response:
          if (currentLine.length() == 0) {
            // HTTP headers always start with a response code (e.g. HTTP/1.1 200 OK)
            // and a content-type so the client knows what's coming, then a blank line:
            client.println("HTTP/1.1 200 OK");
            client.println("Content-type:text/html");
            client.println();

            // the content of the HTTP response follows the header:
            client.print("<h1>Click <a href=\"/H\">here</a> to turn the LED on pin 5 on.</h1>");
            client.print("<h1>Click <a href=\"/L\">here</a> to turn the LED on pin 5 off.</h1><br>");
            client.print("<h1>Click <a href=\"/M\">here</a> to turn the LED on pin 14 on.</h1>");
            client.print("<h1>Click <a href=\"/N\">here</a> to turn the LED on pin 14 off.</h1><br>");           

            //client.print(html);
            // The HTTP response ends with another blank line:
            client.println();
            // break out of the while loop:
            break;
          } else {    // if you got a newline, then clear currentLine:
            currentLine = "";
          }
        } else if (c != '\r') {  // if you got anything else but a carriage return character,
          currentLine += c;      // add it to the end of the currentLine
        }

        // Check to see if the client request was "GET /H" or "GET /L":
        if (currentLine.endsWith("GET /H")) {
          digitalWrite(led5, HIGH);               // GET /H turns the LED on
         }
        if (currentLine.endsWith("GET /L")) {
          digitalWrite(led5, LOW);                // GET /L turns the LED off
          }
        if (currentLine.endsWith("GET /M")) {
            digitalWrite(led14, HIGH);
        }
        if (currentLine.endsWith("GET /N")) {
          digitalWrite(led14, LOW);
        }        
      
      }
    }
    // close the connection:
    client.stop();
    Serial.println("Client Disconnected.");
  }
}


/**
 WiFi Web Server LED Blink
*/
 
#include <WiFi.h>

// mobile routerのもの
const char* ssid     = "wx03-xxxx";
const char* password = "xxxxxxxxx";

const char html[] = 
"<!DOCTYPE html><html lang='ja'><head><meta charset='UTF-8'>\
<style>input {margin:8px;width:80px;}\
div {font-size:16pt;color:red;text-align:center;width:400px;border:groove 40px orange;}</style>\
<title>WiFi_LED Test</title></head>\
<body><p>LED Test</p>\
<form method='get'>\
<input type='submit' name='ron' value='赤ON' /><br>\
<input type='submit' name='rof' value='赤OFF' /><br>\
<input type='submit' name='gon' value='緑ON' /><br>\
<input type='submit' name='gof' value='緑OFF' /><br>\
</form></body></html>";


WiFiServer server(80);

const int led5 = 5;
const int led14 = 14;

void setup()
{
    Serial.begin(115200);
    pinMode(led5, OUTPUT);      // set the LED pin mode
    pinMode(led14, OUTPUT);
    delay(10);

    // We start by connecting to a WiFi network

    Serial.println();
    Serial.println();
    Serial.print("Connecting to ");
    Serial.println(ssid);

    WiFi.begin(ssid, password);

    while (WiFi.status() != WL_CONNECTED) {
        delay(500);
        Serial.print(".");
    }

    Serial.println("");
    Serial.println("WiFi connected.");
    Serial.println("IP address: ");
    Serial.println(WiFi.localIP());
    
    server.begin();

}

int value = 0;

void loop(){
 WiFiClient client = server.available();   // listen for incoming clients

  if (client) {                             // if you get a client,
    Serial.println("New Client.");           // print a message out the serial port
    String currentLine = "";                // make a String to hold incoming data from the client
    while (client.connected()) {            // loop while the client's connected
      if (client.available()) {             // if there's bytes to read from the client,
        char c = client.read();             // read a byte, then
        Serial.write(c);                    // print it out the serial monitor
        if (c == '\n') {                    // if the byte is a newline character

          // if the current line is blank, you got two newline characters in a row.
          // that's the end of the client HTTP request, so send a response:
          if (currentLine.length() == 0) {
            // HTTP headers always start with a response code (e.g. HTTP/1.1 200 OK)
            // and a content-type so the client knows what's coming, then a blank line:
            client.println("HTTP/1.1 200 OK");
            client.println("Content-type:text/html");
            client.println();

            // the content of the HTTP response follows the header:
            client.print(html);
            // The HTTP response ends with another blank line:
            client.println();
            // break out of the while loop:
            break;
          } else {    // if you got a newline, then clear currentLine:
            currentLine = "";
          }
        } else if (c != '\r') {  // if you got anything else but a carriage return character,
          currentLine += c;      // add it to the end of the currentLine
        }

        if (currentLine.endsWith("GET /?gon")) {
          digitalWrite(led5, HIGH); 
         }
        if (currentLine.endsWith("GET /?gof")) {
          digitalWrite(led5, LOW);
          }
        if (currentLine.endsWith("GET /?ron")) {
            digitalWrite(led14, HIGH);
        }
        if (currentLine.endsWith("GET /?rof")) {
          digitalWrite(led14, LOW);
        }        
      
      }
    }
    // close the connection:
    client.stop();
    Serial.println("Client Disconnected.");
  }
}

●考察
macでうまく書き込めた。これでキット単独で動作していることになる(電池でも動くということ)。
別PCのWindows10のUSBアダプタにつないで動作確認。キットの電源ONの赤色LEDは点いている。スマホからアクセスすると動作しない・・・。
アダプタはACアダプタ付きだからポートのパワーは問題ないはずだが。見るとアダプタの電源が入っていないじゃないか。テラタームでキットからの情報は表示されている。ブラウンアウトでリセットを繰り返していた。思ったよりというかキットの起動電流は少なくないというのは本当だ。